Named after cannabis crusader Jack Herer, aka the Hemperor, they have both enjoyed legendary significance and ‘pot’ loads of fame.

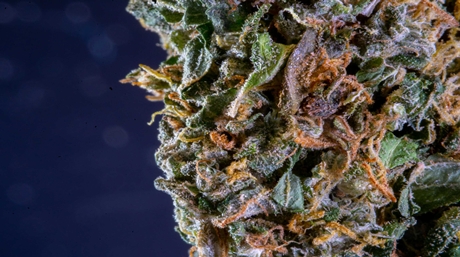
If you’re looking for a strain with pleasing flavors and pleasurable effects, Jack Herer is hugely popular among bud enthusiasts and seasoned growers. Thanks to its clear, motivating, and creative high, this strain has catapulted into global fame. Like most legends, this strain is an understated classic. Created in the 80s in the Netherlands, Jack Herer is a crossbreed of Northern Lights, Shiva Skunk and Haze. With THC ranging between 15% and 24%, the high strikes a fine balance between psychological and physical effects, making sure tokers feel deeply relaxed but alert and mindful.
Country of Origin: Netherlands
Pronunciation: jak heh·ruh
Grow time: 9-11 weeks
Grow difficulty: Moderate to hard
Yield: Moderate
THC: 15% to 24%
Indica: 35%
Sativa: 65%
Yield indoor: Upto 400 grams/14 ounces per sq meter
Yield outdoor: 300 grams/10 ounces per sq meter
Height indoor: Up to 90 cm/35 inch
Height outdoor: Up to 180 cm/70 inch
Before you start growing, you’ll need to decide whether you want to grow indoors or outdoors. You can grow weed wherever you want — as long as it’s legal, of course! It all comes down to resources — how much space, what type of equipment and how much effort you’re going to put in. Jack Herer is a great option for indoor gardens since the weather conditions (sunlight, heat, rain and nutrients) can be controlled and monitored at each stage of the grow. The benefits of indoor gardening over outdoor gardening are well-known. Not only will you have privacy and security, but potency and A-grade quality.
Even for experienced growers, Jack Herer is intimidating. In other words, it’s moderately difficult to grow. But that’s okay, our grow guide is a detailed, visual, crash course in growing. From prep to seed germination, plant growth, and harvesting. We’ll even troubleshoot common problems and give you some hacks, tricks, tips for growing Jack Herer to get you started.

Step 1: Germination is the first step on your journey to growing Jack Herer and the easiest method is the paper towel method. All the seeds will not germinate at the same time, some will sprout quicker than the others. A tell-tale sign that the seed has germinated is when a sprout appears. This single sprout aka the root tip, becomes the main stem or stalk of the plant. If you see this in the first week, pat yourself on the back, it’s a sign of a successful germination.
Step 2: Transplanting germinated Jack Herer seeds is a delicate process. Once the root tip appears, it’ll need to be sown into the soil. Fill small pots with loosely packed, soil and make small holes into the soil. Make sure the soil is airy and not dense. Carefully place the germinated seeds, with the root tip facing down. Gently cover it with soil and sprinkle or spray water so that there’s moisture. But not too much, over-saturating the soil or over-watering is a no-no. Make sure the seedling gets a few hours of light either from a fluorescent lamp or natural sunlight.
In the seedling stage, roots are formed and this is when your plant will need your patience and tender loving care. At this stage, the plant will slowly but surely develop leaves and will be able to absorb certain nutrients. So make sure you mix in a light nutrient solution but not too much, as the plant is fragile.
After the seedling stage – the longest stage begins – the vegetative stage. Get ready for a huge spurt in growth during this week. The plant will have most of its bits and pieces, the main stalk, a few branches and even leaves. This is a good time to watch out for male plants. Though most cultivators use feminized seeds and autoflowers, it’s always good to be extra sure because you don’t want the male plants pollinating the buds produced by female plants.
In the pre-flowering stage, the plant will start to show signs of female flowers and you’ll begin to get a light aroma of the bud. Have in mind that cannabis thrives when the conditions are just right. It’s essential to maintain a relative humidity around 55-60% and the temperature between 18-25°C during the pre-flowering stage. This is also a good time to adjust the nutrients which help your plant in the production of buds, trichomes, and stigmas.
This is when the action happens, and you’ll notice that buds begin to form. By now your plants should be in full-flowering mode, and you’ll notice your plants growing swiftly and that aromatic cannabis smell will be prominent. This is also a time when the plant attracts bugs, so check it for bugs, mold and mildew. White spots or brown spots on the buds are telltale signs that mold has reached your plants.
Pro Tip: You can mask the smell with other aromatic plants like lemongrass and peppermint.
As the flowering continues, you will see your plant getting bigger and fattening up, so feel free to feed your bud a full dose of nutrients. Be careful not to show it too much love by overfeeding it. That will only lower the yields. If your plant is around 110 cm (give or take a few inches), it means the environment you’ve created – humidity, temperature, nutrients and light are just right. Your plant is getting what it needs.
You are now just a week away from harvesting, and the smell will be very pronounced. Almost pungent. Trichomes, which look like microscopic mushrooms will start to appear during this stage. Stigmas which are vibrant, hair-like strands will begin to darken. When they turn brown and wilt, you will know that your plant is ready to harvest.
It’s harvest week! For the next few action-packed weeks, you’ll flush, dry, trim, and cure your homegrown buds. Flushing your marijuana plant is kind of like giving it detox from all the nutrient salts and fertilizer chemicals that the plant has stored in its tissues. It’s an important step or else you’ll be coughing your lungs out each time you puff puff pass.
Once you’ve flushed and trimmed your bud, it’s time to dry it so that it’s potent (wet buds are much less potent). One of the easiest ways is to hang the entire plants upside down. Make sure the buds aren’t touching each other to avoid mold forming. Maintain a steady temperature of 65-75 °F (18-24 degrees °C), with a humidity between 45% and 55%. Avoid putting fans directly on the plant as that will cause it to dry unevenly and make sure the room is dark as direct sunlight degrades the THC.
You can figure out if your buds are ready to be cured by checking how dry it is. If it’s dry but not crumbly, it’s ready to be cured. Curing is easy. Just pile the buds into a mason jar and keep it away from sunlight. Shake it up every couple of days and give it 30 minutes of air. Check the fragrance, texture every once in a while till you find your sweet spot. And finally, smoke it to check for potency.
Congratulate yourself. You have successfully created an original Jack Herer bud with all the good stuff in there. You’ll find that it’s a delicate blend of earthy, grassy, floral, fresh aromas with a full-bodied, herbal and piney flavor. The high is smooth, relaxing, stress-free and uplifting. Indulge in the 65% Sativa and 35% Indica effect that you have crafted with so much soul.
Growing marijuana can be a rewarding hobby, but challenging too. If you’re looking to grow some old-school classics, explore this pastime, without thinking twice. On the plus side, growing weed is as therapeutic and relaxing as smoking it (maybe more!), and nothing is more satisfying than smoking weed that you’ve grown from scratch! We’ll be with you at every step of the way. When deciding which strain you want to grow, do a bit of research on seeds by looking up our handy seeds table. You’ll be able to compare seeds and strains by price, THC, yields, flowering time and growing difficulty. Our clear, easy-to-digest guide is for growers of all kinds, from first-time newbies to experienced growers. Are you ready to go on another herbal adventure?





Related Posts
Have you ever seen a cannabis plant with bug buds growing above a nylon screen? Well, that screen is referred to as a screen of green or a ScrOG in short form.

Amsterdam Seeds: Unveiling the History of Excellence in Cannabis Genetics
Introduction
Welcome, fellow cannabis enthusiasts! Today, we embark on a journey to explore the close association between cannabis seeds and the vibrant city of Amsterdam. The Dutch capital has long been regarded as the world’s hub for marijuana, and the phrase “Amsterdam seeds” has become synonymous with high-quality cannabis genetics…

In the world of cannabis, few strains command the same level of awe and reverence as MOAB, also known as the Mother of All Buds.