What Are Autoflower Marijuana Seeds?
Growing cannabis at home has never been easier thanks to Autoflower Marijuana Seeds, which blend the robust genetics of Indica or Sativa with the speedy flowering of Ruderalis.
Ideal for novice growers, these seeds automatically switch from vegetative growth to the flowering stage without the need to alter light cycles. In this guide, we’ll cover everything you need to know—from what autoflowers are, to step-by-step cultivation tips, and harvesting strategies—to ensure a successful first harvest.
What Are Autoflower Marijuana Seeds?
Autoflower Marijuana Seeds are a unique category of cannabis genetics created by crossing traditional photoperiod Indica or Sativa varieties with the hardy Ruderalis subspecies. While most cannabis plants rely on changing light cycles (typically switching to 12 hours of darkness) to trigger flowering, ruderalis evolved in regions with extremely short summers—Northern Europe, Russia, China, and Mongolia—developing an automatic, age-based bloom cycle instead.
Thanks to this genetic trait, autoflowering strains will begin their transition from vegetative growth to bloom after a set period, usually 3–4 weeks from germination. This natural “timer” removes the need for growers to manipulate light schedules, making Autoflower Marijuana Seeds an exceptional choice for beginners or anyone seeking a low-stress cultivation experience.
Key characteristics of Autoflower Marijuana Seeds include:
- Fast life cycle: Most autocrops finish in approximately 10–11 weeks from seed to harvest, allowing multiple grows per season.
- Compact size: Plants typically remain under one meter tall, fitting discreetly in small indoor tents, balconies, or closets.
- Light schedule flexibility: Growers can run a continuous 18–20 hours of light per day to maximize yield without worrying about a flowering switch.
- Resilience: Ruderalis genetics confer hardiness against cooler temperatures and variable conditions, reducing risk of stress-related setbacks.
By combining the high-THC potency of Indica or Sativa parents with Ruderalis’ automatic bloom timing, creators of Autoflower Marijuana Seeds have given growers the best of both worlds: robust, resinous buds delivered on a reliable, clockwork schedule. In the following sections, we’ll explore how to harness these traits—covering germination, nutrient management, and environmental controls—to help you maximize your first autoflower crop.
Benefits of Choosing Autoflower Marijuana Seeds
1. Speed and Simplicity
One of the most compelling advantages of Autoflower Marijuana Seeds is their rapid life cycle. From seed to harvest, many autoflower varieties complete within 10–11 weeks. This accelerated schedule allows growers to achieve multiple harvests in a single season—ideal for those eager to see results quickly. Moreover, the automatic bloom feature removes the need to switch to a 12/12 light cycle, simplifying operations and reducing the risk of light-stress mistakes. Beginners can focus on watering and feeding rather than intricate light management.
2. Space Efficiency
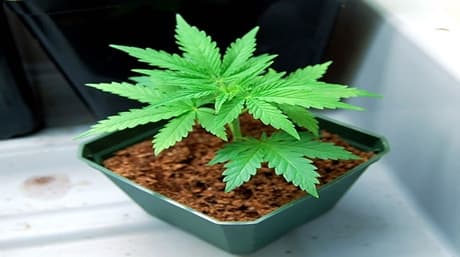
Autoflower Marijuana Seeds produce plants that typically stay under one meter tall, making them perfect for limited spaces. Whether you’re working with a small indoor grow tent, a balcony, or even a closet, compact autoflowers fit comfortably without sacrificing bud production. Their size also makes them easier to train with low-stress training (LST), allowing you to create an even canopy and maximize light exposure.
3. Discreet Cultivation
For growers who need to maintain privacy, the diminutive stature of autoflower plants is a significant benefit. Smaller plants are easier to conceal both indoors and outdoors, reducing the likelihood of unwanted attention. Additionally, the shorter grow cycle means plants spend less time in view, further minimizing the window of detection.
4. Resilience and Hardiness
Thanks to their Ruderalis heritage, autoflowers exhibit enhanced tolerance to cooler temperatures, fluctuating weather, and minor neglect. This resilience makes them forgiving for beginners who may not yet have mastered strict environmental controls. Even if you miss a feeding or accidentally overwater, robust autoflowers often bounce back quickly compared to more delicate photoperiod strains.
How to Germinate Autoflower Marijuana Seeds
Germination is the critical first step to a successful autoflower grow. With proper technique, you’ll achieve high germination rates and give your seedlings the best start. Below is a reliable method that even complete beginners can follow with confidence.
- Soak the Seeds:
Place your Autoflower Marijuana Seeds in a glass of clean, room-temperature water (20–25 °C). Let them soak for 12 to 24 hours. This softens the outer shell and kick-starts metabolic processes. - Prepare the Paper Towels:
Dampen two paper towels until they are moist but not dripping. Fold each towel to create a quadruple layer for extra cushioning. - Nestle the Seeds:
Lay one folded towel on a plate or shallow dish, place seeds about 2 cm apart, then cover with the second towel. Avoid stacking seeds directly on top of each other. - Create a Mini Greenhouse:
Cover the plate loosely with plastic wrap or transfer the towels into a resealable plastic bag. Ensure airflow by leaving a small gap. - Maintain Ideal Conditions:
Store in a warm, dark spot (20–25 °C). Check daily to ensure towels remain damp—spritz gently with water if needed. - Watch for the Taproot:
In 2–5 days, seeds will crack open and reveal a white taproot (~2–5 mm). Handle carefully using tweezers—never touch the root itself. - Transfer to Growing Medium:
Using clean tweezers, place each seed taproot-down into pre-moistened soil, coco coir, or your chosen medium at a depth of ~1–1.5 cm. Lightly cover and mist the surface.
After planting, keep the medium evenly moist and maintain 18–20 hours of gentle light (CFL or LED) at a distance of 20–30 cm. Your seedlings should emerge within 3–7 days, ready to enter the vegetative stage.
Choosing the Right Grow Medium and Nutrients
Selecting an optimal growing medium and nutrient regimen is crucial for maximizing yields and resin production with Autoflower Marijuana Seeds. Autoflowers have a compressed life cycle, so your medium must balance moisture retention, drainage, and nutrient availability from the very start.
1. Soil-Based Mediums
A high-quality, pre-fertilized organic soil is often the easiest choice for beginners:
- Components: Look for blends containing peat moss or coco coir, perlite (20–30%) for aeration, and worm castings or compost for organic nutrients.
- Benefits: Organic soils buffer against nutrient burn, supply beneficial microbes, and simplify feeding schedules.
- Considerations: Over-watering is common—wait until the top 2 cm of soil dries before watering again.
2. Soilless Mixes (Coco Coir)
Coconut coir is a versatile soilless option that provides excellent root oxygenation:
- Components: Pure coco coir or mixes with perlite and vermiculite for structure.
- Benefits: Superior drainage and uniform moisture retention encourage vigorous root development.
- Considerations: Coco locks up calcium and magnesium—use a Cal-Mag supplement and maintain pH at 5.5–6.5 to avoid deficiencies.
3. Hydroponic and Aeroponic Systems
For the most seasoned beginners ready to experiment, hydroponic or aeroponic setups can push growth speed and yields:
- Hydroponics: Nutrient solutions deliver feed directly to roots. Requires strict pH (5.5–6.0) and electrical conductivity (EC 1.0–1.4) monitoring.
- Aeroponics: Roots are misted with nutrient solution—maximizes oxygen but demands precise reservoir maintenance.
- Considerations: More complex equipment and hygiene protocols to prevent root diseases.
4. Nutrient Schedules for Autoflowers
Due to their fast timeline, autoflowers require a gentle but well-timed feeding regimen:
- Seedling Stage (Weeks 1–2):
Use a mild, balanced N-P-K formula (e.g., 2-2-2) at ¼ strength. Seedlings don’t need heavy feeding—focus on maintaining moist, oxygenated roots. - Vegetative Transition (Weeks 3–4):
Increase to ½ strength of a vegetative formula (e.g., 3-1-2). Watch for healthy, dark green foliage without tip burn. - Pre-Flower to Flower (Weeks 5–7):
Switch to a bloom formula higher in phosphorus and potassium (e.g., 2-4-4) at ¾ strength. Feed every other watering to prevent salt buildup. - Late Flower (Weeks 8–10):
Maintain bloom nutrients at ¾ strength, then begin a light flush with pH-corrected plain water during the final week to clear residual salts and improve flavor.
Always start nutrient adjustments conservatively—autoflowers have limited time to recover from stress. Monitor runoff pH (ideal 6.0–6.8 in soil, 5.5–6.5 in coco) and electrical conductivity to ensure roots stay in an optimal feeding zone.
Light Cycles and Environmental Conditions
Although Autoflower Marijuana Seeds don’t require a strict 12/12 light cycle to bloom, providing consistent lighting and optimal environmental parameters will maximize vigor and yield.
1. Photoperiod Strategy
Recommended Light Cycle:
- 18/6 (Light/Dark): Balances power consumption and growth, widely used by beginners.
- 20/4: Slightly more light can boost bud development without over-stressing the plant.
- 24/0: Offers maximum photosynthesis but may hinder plant respiration; reserve for short bursts if electricity is very cheap.
Whichever cycle you choose, maintain the same daily schedule throughout the entire grow to avoid shock.
2. Temperature Management
Vegetative Stage:
Keep daytime temps between 20–26 °C and nighttime no lower than 18 °C.
Flowering Stage:
Aim for 20–25 °C during lights-on and 17–20 °C during lights-off to encourage resin production and terpene development.
3. Humidity Control
- Seedling Stage: 65–70% RH to prevent dry-out of delicate leaves.
- Vegetative Stage: 55–65% RH to support rapid leaf expansion and transpiration.
- Flowering Stage: 40–50% RH to reduce mold risk on dense buds.
4. Airflow and Ventilation
Circulating fresh air strengthens stems, disperses heat, and keeps pests at bay. Position a small oscillating fan at canopy level, and exhaust stale air with an inline fan and carbon filter if growing indoors.
Training Techniques for Autoflower Marijuana Seeds
While autoflowers are generally more sensitive to stress than photoperiod varieties, gentle training can significantly boost your yields and promote an even canopy. Here are two beginner-friendly methods:
1. Low-Stress Training (LST)
- Start Early: Begin when plants have 3–4 nodes (around week 2–3), before the flowering stretch.
- Bend and Tie: Gently bend the main stem horizontally, securing it with soft plant ties or garden wire to a low stake or edge of the pot.
- Create an Even Canopy: As side branches grow, continue to tie them down to spread out bud sites evenly under the light.
- Monitor Plant Health: Avoid kinks or over-bending. If a stem resists, wait another day or two for better pliability.
2. Screen of Green (SCROG) – Simplified
A basic SCROG uses a horizontal net or screen to weave branches, maximizing light penetration and air circulation.
- Setup: Place a mesh screen (with ~10 cm openings) about 20–30 cm above the pot.
- Weaving: As branches grow through the mesh, gently tuck and weave them laterally to fill open spaces.
- Maintenance: Continue training until pre-flowering; once buds start to form, leave them be and let them fatten under the screen.
Nota: Avoid heavy topping or defoliation on autoflowers, as recovery time is limited. Stick to light bending and minimal pruning to prevent undue stress.
Harvesting and Drying
Knowing exactly when to harvest your Autoflower Marijuana Seeds plants makes the difference between a mediocre yield and top-shelf-quality buds. The key indicator is the appearance of trichomes (the resin glands), which change color as cannabinoids mature.
1. Timing Your Harvest
Use a 30×–60× magnifying loupe or microscope to examine the trichomes on the buds:
- Clear Trichomes: Immature—wait for further development.
- Milky/Cloudy Trichomes: Peak THC potency, delivering euphoric and cerebral effects.
- Amber Trichomes: THC converting to CBN, yielding a more sedative, body-focused high.
Most growers harvest when approximately 70–80% of trichomes are milky and 20–30% amber, striking a balance between potency and flavor.
2. Wet vs. Dry Trimming
Decide whether to trim immediately after cutting (wet trimming) or after the initial dry (dry trimming):
- Wet Trimming:
Trim leaves before hanging. Pros: neater drying, faster turnaround.
Cons: sticky resin can gum up scissors. - Dry Trimming:
Hang whole branches, trim leaves once buds are firm. Pros: easier cutting, preserves trichomes.
Cons: longer drying time, larger space needed.
3. Proper Drying Technique
- Hang Branches:
Cut branches into manageable lengths and hang upside-down in a dark room with good air circulation. - Maintain Conditions:
Keep temperature at 18–20 °C and humidity around 50%–55%. Too much humidity invites mold; too little dries buds too fast, degrading terpenes. - Dry Duration:
Typically 7–10 days. Buds are properly dried when small stems snap rather than bend.
4. Curing for Optimal Flavor and Potency
Curing transforms dried buds into smooth, flavorful cannabis:
- Jar Up:
Place trimmed buds in airtight glass jars, filling them no more than ¾ full to allow slight air exchange. - Burst and Rotate:
For the first 7–10 days, open jars (“burp”) for 5–10 minutes daily to release moisture and replenish oxygen. - Extended Cure:
After the initial period, cure for at least 2–4 weeks, opening jars only once a week. Longer cures (up to 6 months) can further enhance smoothness and depth of flavor.
A well-cured autoflower harvest rewards you with richer aromas, sharper flavors, and a more balanced high.
Tips for Beginner Growers
Embarking on your first autoflower grow can be exciting and a bit overwhelming. Follow these tips to build confidence and avoid common pitfalls:
- Start Small: Limit your initial grow to 2–4 plants. This keeps management simple and helps you focus on learning each stage without feeling overwhelmed.
- Monitor pH Levels: Keep soil pH between 6.0–7.0 or coco/hydro pH at 5.5–6.5. Inaccurate pH can lock out nutrients, leading to deficiencies.
- Use Quality Containers: Fabric pots or air-pruning pots encourage healthier root systems by preventing circling roots and promoting oxygenation.
- Maintain Cleanliness: Sterilize tools, pots, and your workspace before each use. Good hygiene reduces the risk of pests, mold, and pathogens.
- Observe Daily: Spend a few minutes each day checking leaf color, soil moisture, and overall vigor. Early detection of issues—like nutrient burn or spider mites—lets you intervene promptly.
- Document Your Process: Keep a grow journal logging germination dates, feed schedules, environmental data, and any adjustments. This record helps refine your technique in subsequent grows.
Conclusion
Autoflower Marijuana Seeds represent a versatile and forgiving option for novice home growers. Their rapid life cycle, compact stature, and automatic flowering simplify the cultivation process, allowing even beginners to achieve multiple bountiful harvests each season. By mastering germination, selecting the right medium, following a tailored nutrient schedule, and maintaining optimal environmental conditions, you’ll be well on your way to producing dense, resinous buds with robust aromas and potent effects.
Remember to start small, maintain proper pH, and document every step of your grow. With patience and careful observation, autoflowers can quickly become your go-to choice for stress-free cannabis cultivation. Embrace the journey—your first successful harvest is just weeks away!